How to connect DVD To Receiver To TV Using S-Video Digital Coaxial Wires
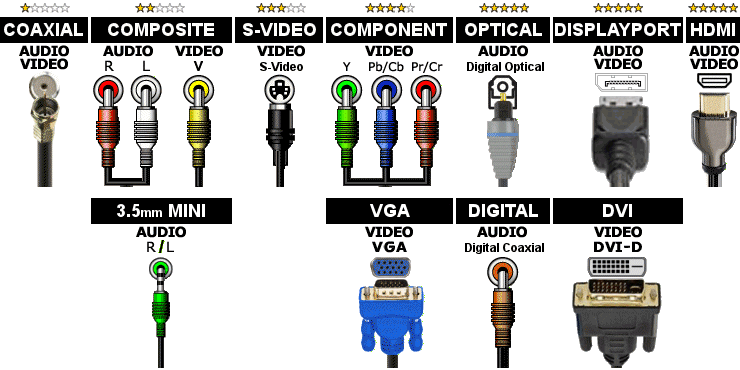
Click here for help identifying the different types of wires and connectors
Click here for help identifying connectors on the back of components
Click here to see this wiring diagram
Wiring Instructions:
- Connect one end of the Digital Coaxial cable to the DVD connector labeled Digital Coaxial Output and the other end to a Digital Coaxial connector on the Receiver that also has a S-Video connector in the same section.
- Connect one end of the S-Video cable to the DVD connector labeled S-Video, Output, Monitor or TV and the other end to the S-Video Input on the Receiver that is next to the Digital Coaxial Audio connector above.
- Connect one end of the Digital Coaxial cable to the Receiver connector labeled Digital Coaxial Output and the other end to a Digital Coaxial connector on the TV that also has a S-Video connector in the same section.
- Connect one end of the S-Video cable to the Receiver connector labeled S-Video, Output, Monitor or TV and the other end to the S-Video Input on the TV that is next to the Digital Coaxial Audio connector above.
- To watch a DVD, turn on the Receiver and select the Input on the Receiver that corresponds to the label next to where you connected the S-Video cable from the DVD Player and then select the Input on the TV that corresponds to the label next to where you connected the S-Video cable from the Receiver.
Note: These instructions do not include any additional customizations you may have made.
Select the components below to add them to the diagram.
| No TV | No Receiver | No TV Source | No CD | No Computer |
| TV | A/V Receiver | Cable Box | CD Player | Computer |
| Input Selector | Satellite | SACD Player | ||
| No VCR | No DVD Player | No DVD Recorder | No Game System | No Record Player |
| VCR | DVD Player | DVD Recorder | Game System | Record Player |
| VCR/DVD Combo | BluRay Player | TiVo / DVR |
Start Over with a new diagram
Wiring Diagram Resize Diagram: 100%
Instructions for using this page:
- Click the buttons at the top to add Audio/Video components to the diagram.
- Click
 or
or  to add or remove outputs from a component.
 - Use the first drop down list on each component to connect to a different component.
- Use the second drop down list to change the type of wire. More stars below means better quality wire.
